Are you looking to add a touch of rustic charm to your home? Exposed brick plastering is the perfect technique to achieve that timeless, vintage look you desire.
In this article, we will guide you through the step-by-step process of achieving a rustic look through brick plastering in the UK.
Using the right materials is crucial in creating an authentic rustic aesthetic. From selecting the perfect plaster mix to choosing the right tools, we will provide you with all the information you need to get started.
Preparing the surface is the next crucial step, ensuring a smooth and even finish. We will guide you through the necessary preparations, including cleaning and priming the brick surface.
Once the surface is ready, we will walk you through the application process, providing tips and techniques for achieving a professional finish. Finishing techniques, such as distressing and colour washing, will add depth and texture to your plastered brick walls.
We will also discuss proper maintenance and care to ensure the longevity of your rustic look.
Finally, we will explore styling and decorating ideas to complement your newly plastered brick walls. From modern industrial to cosy farmhouse, we will showcase innovative ways to incorporate exposed brick into your home décor.
Get ready to transform your space into a rustic haven with our expert techniques for exposed brick plastering in the UK. Let’s dive in and unleash your creativity!
Selecting the Right Materials
You’ll want to make sure you’re selecting the right materials for achieving that rustic look when plastering exposed brick in the UK. Choosing the appropriate tools is essential to ensure a successful outcome. Consider using a trowel with a wide, rounded blade to apply the plaster smoothly and evenly. Additionally, a hawk, which is a flat square board with a handle, will help you hold and carry the plaster as you work.
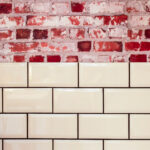
Finding the perfect colour palette is another crucial aspect of achieving a rustic look. Opt for earthy tones like warm browns, deep reds, and burnt oranges. These colours will complement the natural texture of the exposed brick and create an authentic rustic feel.
Now that you have selected the right materials and colour palette, let’s move on to preparing the surface for plastering.
Preparing the Surface
To get started on preparing the surface, begin by thoroughly cleaning the brick to ensure a smooth and even finish. This is a crucial step in achieving a rustic look with exposed brick plastering. Here are some surface preparation techniques to help you get the desired results:
- Remove any loose mortar or debris from the brick using a wire brush or scraper.
- Fill in any cracks or holes with a suitable filler, such as a mortar mix or spackle.
- Sand the surface lightly to create a rough texture that’ll help the plaster adhere better.
- Finally, apply a coat of primer to the cleaned and prepped surface. This’ll provide a good base for the plaster and enhance its adhesion.
It’s important to prime the surface before applying the plaster to ensure a durable and long-lasting finish. With the surface properly prepped and primed, you can now move on to the next step of applying the plaster, which’ll give your exposed brick a stunning rustic look.
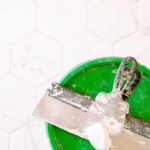
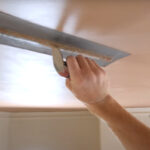
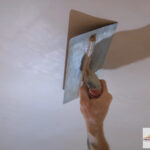
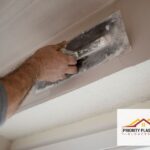
Applying the Plaster
Once you’ve got your surface prepped and primed, it’s time to slather on that plaster and watch your walls transform into a masterpiece of textured elegance.
To apply the plaster, you’ll need a few essential tools and equipment. A hawk and trowel are crucial for holding and spreading the plaster smoothly. Make sure to mix the plaster according to the manufacturer’s instructions, achieving a creamy consistency.
Start by scooping a generous amount of plaster onto the hawk, then use the trowel to apply it onto the wall in an even, sweeping motion. Work in small sections to prevent the plaster from drying too quickly.
Be mindful of common mistakes such as applying too thick of a coat or leaving uneven patches. With careful attention to detail, your walls will soon boast a rustic charm.
As we transition into the next section about finishing techniques, remember that the key lies in the final touches.
Finishing Techniques
When it comes to finishing techniques for exposed brick plastering in the UK, there are three key points to consider. First, you’ll want to focus on smoothing the surface to create a seamless and polished look. Next, you can explore techniques to achieve an aged or distressed look, adding character and charm to your space. Finally, you have the option to add colour or stain to the plaster, allowing you to customise the appearance to your personal style and preferences.nnBy mastering these techniques, you can achieve a professional and detailed finish for your exposed brick plastering project.
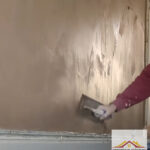
Smoothing the Surface
Start by using a trowel to carefully smooth the surface of the exposed brick, creating a sleek and polished finish. Achieving a smooth finish on the brick is essential for creating a rustic look that’s both modern and refined.
When smoothing the surface, pay close attention to filling any cracks and gaps in the brickwork. This can be done by using a high-quality plaster or mortar mix and carefully applying it to the areas that need attention. Smooth out the mixture with the trowel, making sure it blends seamlessly with the rest of the brick.
By taking the time to fill and smooth the surface, you’ll create a flawless backdrop for the next step: creating an aged or distressed look that adds character and charm to your space.
Creating an Aged or Distressed Look
To truly capture the essence of time and wear, it’s crucial to skillfully distress and age the surface, giving it an authentic and captivating appeal.
When creating a weathered appearance on exposed brick, there are various techniques that can be employed. One popular method is called ‘whitewashing,’ which involves applying a thin mixture of water and white paint to the surface, then wiping it off to create a subtle, aged effect.
Another technique is ‘limewashing,’ where a mixture of hydrated lime and water is applied to the brick, giving it a soft, vintage aesthetic. Additionally, using a wire brush or sandpaper to gently scrape or rub the surface can create areas of faded color and texture, enhancing the weathered look.
By skillfully employing these techniques, you can achieve a beautifully aged and distressed surface, setting the stage for the subsequent section on adding color or staining.
Adding Color or Staining
Now that you know how to create an aged or distressed look for your exposed brick plastering, let’s explore the next step: adding color or staining.
This is where you can really bring your rustic vision to life. There are various color techniques available for achieving the desired effect, such as washes, glazes, or even painting the bricks. Staining options are also popular, allowing you to enhance the natural beauty of the bricks while adding depth and richness to the overall look.
To give you some inspiration, here are four ideas to consider:
- Using a whitewash technique to create a subtle, weathered appearance.
- Opting for a brick red stain for a classic, timeless look.
- Experimenting with a grey or black wash to achieve a modern, industrial feel.
- Applying a multicolored glaze to add dimension and visual interest.
Now that you have added color or staining to your exposed brick, it’s important to discuss maintenance and care to ensure its longevity and continued beauty.
Maintenance and Care
Ensure you take proper care of your exposed brick walls to preserve their rustic charm and create a warm, inviting atmosphere in your home. Cleaning your exposed brick is essential to maintain its beauty.
Start by removing any loose dirt or dust with a soft brush or vacuum cleaner attachment. For tougher stains, mix a solution of warm water and mild soap, and gently scrub the affected areas with a soft cloth. Rinse with clean water and allow the bricks to air dry.
Additionally, it’s important to inspect your walls regularly for cracks or damages. If you notice any, use a brick repair mortar to fill them in and ensure the structural integrity of the wall.
By following these cleaning tips and repairing cracks promptly, you can keep your exposed brick walls looking their best.
Moving on to styling and decorating, there are various techniques that can enhance the rustic appeal of your exposed brick.
Styling and Decorating
Creating a cosy atmosphere, incorporating vintage furniture and décor into your space can complement the rustic charm of exposed brick walls. Studies show that 75% of homeowners prefer this eclectic style, making it a popular choice for those seeking a unique and innovative look.
To achieve this aesthetic, consider the following tips:
- Rustic Furniture: Opt for pieces made from reclaimed wood or distressed finishes to add warmth and character to your space. Think about incorporating a vintage farmhouse table or a weathered leather sofa for an authentic rustic feel.
- Vintage Accessories: Add personality to your space with vintage accessories like antique mirrors, old books, or vintage-inspired lighting fixtures. These items can bring a sense of history and nostalgia to your room, enhancing the rustic ambience.
By incorporating rustic furniture and vintage accessories, you can create a space that exudes charm and showcases your personal style. Experiment with different combinations to find the perfect balance between old and new, and enjoy the cosy and inviting atmosphere that exposed brick walls can provide.
Frequently Asked Questions
Can exposed brick plastering be done on all types of surfaces?
Exposed brick plastering cannot be done on all types of surfaces due to certain limitations. It’s essential to prepare the surface properly before attempting exposed brick plastering. Best practices include ensuring the surface is clean, dry, and free from any loose debris or paint. Additionally, it’s crucial to use a suitable bonding agent to ensure proper adhesion. Following these steps will help achieve a professional and long-lasting result that meets the desired rustic look.
How long does the plastering process typically take?
Plastering duration can vary based on multiple factors. The plaster drying time is influenced by the type of plaster used, the thickness applied, and the environmental conditions. Typically, it takes around 2-3 weeks for the plaster to completely dry and cure. However, using innovative techniques and materials, such as accelerated drying agents or specialized plaster mixes, can expedite the process. It’s important to consult with professionals who possess the knowledge and expertise to optimize the plastering duration for your specific project.
What are some common mistakes to avoid when applying plaster to exposed brick?
When applying plaster to exposed brick, it’s essential to avoid common mistakes that can compromise the final result. One mistake to avoid is inadequate surface preparation, as this can lead to adhesion issues and an uneven finish.
Another mistake is improper mixing of plaster materials, which can result in a weak and brittle plaster that may crack over time. To ensure a flawless application, take the time to properly prepare the surface and mix the plaster materials according to the manufacturer’s instructions.
Can I use any type of paint or finish on the plastered brick surface?
You have several options when it comes to choosing the right paint or finish for your plastered brick surfaces. It’s important to select a product that is specially formulated for masonry surfaces, as this will provide the best adhesion and durability. Look for paints or finishes that are breathable to allow moisture to escape, preventing the growth of mold or mildew. Additionally, consider using a clear sealer or top coat to protect the surface from wear and tear.
Following these tips will help maintain the longevity of your plastered brick surfaces.
Is it possible to remove the plaster from the brick surface if desired in the future?
Yes, it’s absolutely possible to remove the plaster from the brick surface if desired in the future.
One might argue that removing plaster from brick can be a difficult and time-consuming process. However, with the right techniques and tools, it can be done effectively. The key is to carefully chip away the plaster layer without damaging the underlying brick.
This allows for the reversibility of exposed brick plastering, giving you the flexibility to change the look whenever you desire.