Imagine you are embarking on a journey through time, exploring the rich tapestry of history in the United Kingdom. As you wander through ancient castles and stately homes, you are captivated by the exquisite plasterwork adorning the walls and ceilings. The intricate designs and flawless finishes transport you to another era, where craftsmanship and attention to detail were revered.
But what if these masterpieces were left to crumble and decay, neglected and forgotten? The beauty and grandeur would fade away, lost to the ravages of time. The same can be said for your own renovation projects. The importance of surface preparation in plastering cannot be overstated. It is the foundation upon which the entire process relies.
In the realm of renovation plastering, surface preparation is the key to unlocking the true potential of your project. It involves assessing the condition of the surface, cleaning and removing existing materials, repairing and patching damaged areas, applying a primer or sealer, and levelling and smoothing the surface. Each step is crucial in creating a flawless finish that will withstand the test of time.
So, dear renovator, embrace the power of surface preparation. By taking the time to properly prepare your surfaces, you are setting the stage for innovation and transformation. Allow your renovation projects to stand as testaments to your commitment to excellence, just like those ancient plastered masterpieces that continue to inspire awe and admiration.
Assessing the Condition of the Surface
Now, let’s take a moment to assess the condition of your surface and see what needs to be done to achieve that perfect finish.
Surface preparation techniques play a crucial role in ensuring a successful renovation plastering project in the UK. Before diving into the actual plastering process, it’s essential to conduct a thorough evaluation of the surface.
This step is often overlooked, but it can make a significant difference in the outcome. By assessing the condition of the surface, you can identify any underlying issues such as cracks, dampness, or unevenness that need to be addressed before plastering.
It allows you to plan the necessary repairs and adjustments, ensuring a solid foundation for the plaster to adhere to.
So, let’s move on to the next section, where we’ll discuss the importance of cleaning and removing existing materials.
Cleaning and Removing Existing Materials
First, you need to ensure that you thoroughly clean and remove any existing materials before beginning the plastering process. This is a crucial step in surface preparation, as it allows for a smooth and even application of the new plaster.
To make this task more enjoyable, here are some surface preparation techniques to consider:
- Start by removing debris such as loose paint, wallpaper, or flaking plaster. This can be done using a scraper or a wire brush.
- Use a vacuum cleaner or a brush to remove any dust or dirt from the surface.
- Finally, wash the surface with a mild detergent and warm water to remove any remaining residue.
By following these steps, you are laying the foundation for a successful plastering job.
Now, let’s move on to repairing and patching damaged areas without compromising the overall integrity of the surface.
Repairing and Patching Damaged Areas
To address any imperfections in the walls, you’ll want to focus on restoring and patching damaged areas in order to create a flawless and polished finish.
Drywall repair and plaster restoration are essential steps in this process. Begin by assessing the damaged areas and determining the best approach for repair. Whether it’s filling in cracks, holes, or gouges, or replacing sections of damaged drywall, it’s crucial to ensure a smooth and even surface.
Use a high-quality patching compound or joint compound to fill in the damaged areas, and then sand the patched areas until they’re level with the surrounding wall. This meticulous attention to detail will ensure a seamless finish that’s ready for the next step: applying a primer or sealer to create a solid foundation for the new plaster or paint.
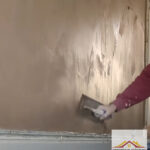
Applying a Primer or Sealer
Applying a primer or sealer is an essential step in preparing the walls for a flawless and polished finish, creating a solid foundation for the new plaster or paint. Using a high-quality primer offers several advantages, including improved adhesion, increased durability, and enhanced resistance to moisture and stains.
It also helps to even out the surface, filling in any small cracks or imperfections, resulting in a smoother and more uniform appearance. To achieve a smooth and even application, make sure to clean the walls thoroughly and remove any loose debris or old paint. Use a roller or brush to apply the primer in thin, even coats, working from top to bottom and overlapping each stroke.
Allow the primer to dry completely before moving on to the next step. By applying a primer or sealer correctly, you’re one step closer to achieving a perfectly leveled and smoothed surface for your renovation project.
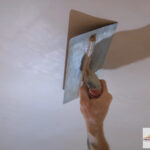
Leveling and Smoothing the Surface
Achieving a perfectly leveled and smoothed surface is key to creating a flawless and polished finish that will make your walls look amazing. To achieve this, you need to utilize proper sanding techniques and surface preparation tools.
Start by using a sanding block or sandpaper to remove any rough patches or imperfections on the surface. Take your time and make sure to sand evenly and thoroughly. You may also need to use a putty knife or scraper to level out any uneven areas before sanding.
Once the surface is smooth, use a damp cloth to remove any dust or debris. This will ensure a clean and even surface for the next step of the renovation process.
By following these steps, you will be on your way to creating a professional-looking finish.
Now, let’s move on to ensuring proper drying and curing time for the best results.
Ensuring Proper Drying and Curing Time
Now that you’ve successfully levelled and smoothed the surface, it’s crucial to ensure proper drying and curing time before proceeding with the next steps of your renovation plastering project. This step is often overlooked, but it’s essential for achieving a flawless finish.
Proper moisture content is vital to prevent any issues such as cracking or peeling of the plaster. To ensure proper drying and curing time, there are a few key steps you should follow:
- Allow sufficient time for the plaster to dry completely before applying any additional coats or finishes.
- Use a moisture meter to measure the moisture content of the plaster. Aim for a moisture content of around 5-6% before proceeding.
- Provide adequate ventilation to help speed up the drying process.
- Avoid premature application of additional coats or finishes, as this can trap moisture and lead to problems down the line.
By following these steps, you can ensure that your plaster is properly dried and cured, creating a solid foundation for a successful renovation plastering project.
Frequently Asked Questions
What are the common types of surfaces that require renovation plastering in the UK?
When it comes to renovation plastering in the UK, there are several common types of surfaces that require attention. Walls with existing plaster that’s damaged or uneven, as well as surfaces with wallpaper or paint that needs to be removed, are often in need of renovation plastering.
Common mistakes in surface preparation include not properly cleaning and priming the surface, which can result in a poor finish. To achieve a smooth and durable plaster finish, it’s crucial to invest time and effort into thorough surface preparation.
Can I skip the cleaning and removing existing materials step if the surface looks relatively clean?
Can you skip the cleaning and removing existing materials step if the surface looks relatively clean? Is it possible to achieve a smooth finish without removing existing materials?
While it may be tempting to skip these steps, it’s crucial to understand the importance of surface preparation in renovation plastering. Even if the walls appear clean, there may be hidden contaminants that could affect the adhesion of the new plaster.
By thoroughly cleaning and removing any existing materials, you ensure a solid foundation for the plaster, resulting in a flawless and long-lasting finish.
How long does it typically take to repair and patch damaged areas before applying plaster?
To properly prepare damaged areas before plastering, it’s crucial to follow a meticulous process. Start by assessing the extent of the damage and removing any loose or crumbling material.
Next, clean the surface thoroughly, ensuring there isn’t any dirt, grease, or dust. This step is vital as it allows the plaster to adhere properly and ensures a smooth and durable finish.
Take the time to repair any cracks or holes using a suitable filler. By taking these steps, you guarantee a flawless and long-lasting result.
Is it necessary to apply a primer or sealer before plastering, or can I skip this step?
It’s essential to apply a primer before plastering because it serves multiple important functions. A primer creates a smooth and uniform surface, enhancing the adhesion of the plaster. It also helps prevent the absorption of moisture from the plaster, ensuring a longer-lasting finish.
By skipping this step, you risk compromising the overall quality and durability of the plaster. Therefore, it’s highly recommended to prioritize the primer application for optimal results in your renovation plastering project.
How long does the surface need to dry and cure before it can be painted or finished?
You want your newly plastered surface to be ready for painting or finishing as soon as possible, but it’s important to be patient and allow proper drying and curing time.
The surface needs to be completely dry before painting or finishing can take place, and this can take anywhere from a few days to a few weeks, depending on the conditions. Proper ventilation is crucial during this process to ensure that moisture evaporates efficiently.
Temperature and humidity also play a significant role in the drying and curing time, so it’s essential to monitor and control these factors to achieve the best results. By allowing the surface to dry and cure properly, you’ll ensure a durable and flawless finish.