Are you ready to transform your walls into a masterpiece? If you’re looking to add a touch of innovation to your home, installing plasterboard is the way to go.
This step-by-step guide will walk you through the process of installing plasterboard on walls in the UK, ensuring a flawless finish.
Like a conductor orchestrating a symphony, you’ll gather your tools and materials—a tape measure, saw, screws, and plasterboard sheets. With precision, you’ll prepare your walls, ensuring they are clean and free of imperfections.
Next, you’ll measure and cut the plasterboard sheets to fit perfectly on your walls, leaving no room for error. With the grace of a dancer, you’ll install the sheets, securing them in place.
Now it’s time to bring it all together. Applying jointing compound and tape, you’ll seamlessly blend the edges, creating a seamless surface. Finally, like a sculptor refining their masterpiece, you’ll sand and finish the plasterboard, leaving your walls smooth and ready for a fresh coat of paint.
Get ready to unleash your inner innovator as you embark on this plasterboard installation journey.
Let’s get started!
Gather the Necessary Tools and Materials
Now that we know what we need, let’s gather all the tools and materials that’ll help us get started with installing plasterboard on our walls!
To begin, you’ll need the following items: a utility knife, a tape measure, a pencil, a straight edge, a plasterboard saw, a screwdriver, a drill, plasterboard screws, adhesive, a trowel, and sandpaper.
Additionally, make sure to choose the right plasterboard for your project. Consider factors such as moisture resistance, fire resistance, and thickness. You can ask for advice at your local hardware store to ensure you select the best option.
It’s also important to be aware of common mistakes to avoid when installing plasterboard on walls. These include not measuring accurately, using too few or too many screws, and not applying adhesive properly.
Once you have gathered all the necessary tools and materials, you can move on to preparing the walls for installation.
Prepare the Walls for Installation
Before you start, take a moment to prepare your walls for the installation of plasterboard and get ready to transform your space.
Preparing the walls for plasterboard installation is an essential step that ensures a smooth and durable finish. Start by removing any existing wallpaper or loose paint from the walls. Fill in any cracks or holes with a suitable filler and sand them down to create a flat surface.
Next, clean the walls thoroughly to remove any dust or debris.
Once the walls are clean and dry, it’s time to choose the right type of plasterboard for your project. Consider factors such as moisture resistance, fire resistance, and acoustic properties to select the best option for your needs.
With the walls prepared and the plasterboard chosen, you’re now ready to measure and cut the plasterboard sheets for installation.
Measure and Cut the Plasterboard Sheets
To measure and cut the plasterboard sheets, start by measuring the height and width of the wall and mark those measurements on the plasterboard. Then, using a utility knife, score the plasterboard along the marked lines.
After scoring, you can easily snap the plasterboard along the scored line. Finally, trim any excess with a utility knife to ensure a precise fit.
Measure the height and width of the wall
Get ready to be amazed by the simplicity of measuring the height and width of your wall! When it comes to plasterboard installation, accurate measurements are crucial.
To ensure a flawless fit, let’s explore some measuring techniques and common mistakes to avoid. First, grab a tape measure and position it vertically against the wall to measure the height. Make sure the tape measure is straight and level, and take note of the measurement.
Next, measure the width by placing the tape measure horizontally from one side of the wall to the other. Double-check your measurements to avoid any errors.
Once you have the precise height and width, you’re ready to mark the measurements on the plasterboard.
[Transition into the next section: Now that you have your measurements, it’s time to mark them on the plasterboard.]
Mark the measurements on the plasterboard
Now that you’ve got your measurements, it’s time to work your magic and mark them on the plasterboard, unleashing the transformative power of precision. Follow these tips for accurately measuring and cutting plasterboard sheets:
- Start by using a pencil or chalk to mark the top and bottom measurements on the board.
- Use a straightedge or level to draw a straight line connecting the top and bottom marks.
- Measure and mark the width of the wall on the board, making sure it aligns with the previous marks.
- Double-check your measurements to ensure accuracy before proceeding.
Repeat these steps for each plasterboard sheet you plan to install.
With the measurements properly marked, you’re now ready to use a utility knife to score the plasterboard. This will be covered in the next section.
Use a utility knife to score the plasterboard
Once you’ve marked the measurements on the plasterboard, it’s time to unleash your inner artist and use a trusty utility knife to score the plasterboard, giving it that perfect cut.
A utility knife is a versatile tool that you can also use for other DIY projects, making it a valuable addition to your toolbox.
To properly score the plasterboard, start by positioning a straight edge along the marked line. Apply firm pressure and run the utility knife along the edge, making multiple passes if necessary. This will create a shallow groove in the plasterboard without cutting all the way through.
Be sure to maintain a steady hand and follow the marked line accurately for a clean cut.
Once you’ve scored the plasterboard, it’s time to move on to the next step of snapping it along the scored line, ensuring a precise fit for your wall.
Snap the plasterboard along the scored line
Using a smooth and deliberate motion, carefully snap the plasterboard along the scored line to achieve a precise fit for your wall. This step is crucial in ensuring that the plasterboard aligns perfectly with the wall’s dimensions.
To snap the plasterboard, apply pressure on both sides of the scored line, gradually increasing the force until it breaks cleanly. Be cautious not to apply too much force, as this can cause the plasterboard to crack or break unevenly.
Once the plasterboard is snapped, you can proceed to the next step, which is trimming any excess with a utility knife. This will help create a clean and polished finish for your plasterboard installation.
Trim any excess with a utility knife
After snapping the plasterboard along the scored line, it’s time to grab a trusty utility knife and trim away any excess for that perfect, polished finish.
Here are three trimming techniques to ensure a flawless result:
- Start by holding the utility knife at a slight angle and make a shallow cut along the excess edge of the plasterboard. This will create a guide for your deeper cuts.
- Gradually increase the pressure as you follow the guide, scoring deeper into the plasterboard. Be careful not to apply too much force, as it may cause the board to crack or break.
- Once the score is deep enough, snap off the excess piece by gently bending it away from the scored line. For a clean edge, use the skimming technique out any rough spots.
Common mistakes in trimming include using excessive force, which can damage the plasterboard, and rushing the process, resulting in uneven cuts.
Now that the excess is trimmed, it’s time to move on to the next section and install the plasterboard sheets seamlessly.
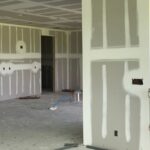
Install the Plasterboard Sheets
To install the plasterboard sheets, start at one corner of the wall and work your way across. Use a screwdriver to attach the plasterboard to the wall studs, making sure to space the screws evenly along the edges and in the middle of the plasterboard.
Repeat this process for each plasterboard sheet, leaving a small gap between the sheets for expansion.
Start at one corner of the wall
Let’s get this plasterboard installation underway by starting in one corner of the wall. Starting from a different corner can help you achieve a more balanced and professional finish.
Here are a few tips for avoiding common mistakes when installing plasterboard:
- Measure twice, cut once: Ensure accurate measurements before cutting the plasterboard sheets to size. This’ll save you time and material.
- Use adhesive and screws: Apply construction adhesive to the back of the plasterboard and secure it to the wall studs using screws. This’ll provide extra stability.
- Mind the gaps: Leave a small gap between each sheet to allow for expansion. Use a gap-filling compound to seal any visible joints.
- Check for level and plumb: Use a spirit level and plumb line to ensure that the plasterboard is straight and aligned correctly.
Now that you have the plasterboard sheets in place, it’s time to use a screwdriver to attach them to the wall studs. This’ll provide a secure and sturdy installation.
Use a screwdriver to attach the plasterboard to the wall studs
Now that you’ve started at one corner of the wall, it’s time to move on to the next crucial step in installing plasterboard: using a screwdriver to attach the plasterboard to the wall studs.
This method offers several advantages compared to other tools. Firstly, a screwdriver allows for precise control, ensuring that each screw is securely fastened without damaging the plasterboard. Additionally, using a screwdriver provides better leverage, reducing the risk of the screw stripping or becoming loose over time.
However, there are some common mistakes to avoid when using a screwdriver for attaching plasterboard to wall studs. Be sure to use the appropriate size and type of screwdriver bit to prevent slipping or damaging the screw head. Also, take care not to over-tighten the screws, as this can cause the plasterboard to crack.
With the plasterboard securely attached, you’re now ready to space the screws evenly along the edges and in the middle of the plasterboard, ensuring a strong and seamless installation.
Space the screws evenly along the edges and in the middle of the plasterboard
For a sturdy and seamless installation, evenly space the screws along the edges and in the middle of the plasterboard, ensuring a professional finish. To achieve this, start by placing the first screw about 12 inches from the top and bottom edges of the plasterboard, and continue spacing them every 12 inches along the rest of the edges.
In the middle of the plasterboard, place screws approximately 16 inches apart. This spacing will provide adequate support and prevent the plasterboard from sagging or warping over time. Make sure to countersink the screws slightly, so they sit flush with the surface of the plasterboard. By spacing the screws evenly, you’ll create a strong and secure foundation for your plasterboard.
Now, let’s transition to the next step: repeating this process for each plasterboard sheet.
Repeat the process for each plasterboard sheet
To ensure a flawless and secure installation, you’ll want to replicate this process for each plasterboard sheet. Evenly space the screws along the edges and in the middle for a professional finish.
Start by positioning the next plasterboard sheet next to the first one, making sure the edges are aligned. Use a spirit level to check for any unevenness or gaps between the sheets. Once aligned, repeat the process of marking the screw positions every 150mm along the edges and in the middle of the sheet.
Then, drive the screws into the marked positions, making sure they’re flush with the surface but not over-tightened. This will securely attach the plasterboard to the wall. By following these tips for achieving a smooth finish on the plasterboard, you’ll be one step closer to a perfect installation.
Now, let’s move on to the next section about leaving a small gap between the sheets for expansion.
Leave a small gap between the sheets for expansion
Ensure a flawless installation by leaving a small gap between the plasterboard sheets to allow for expansion. This expansion gap is important because it accommodates any movement that may occur due to changes in temperature and humidity. By providing this space, you can prevent cracks and warping in the plasterboard, ensuring a smooth and durable finish.
To create the expansion gap, follow these steps:
- Measure and mark the desired gap size on the wall. 2. Use a straight edge to guide your knife as you cut along the marked line. 3. Remove any excess material from the gap using a utility knife or sandpaper. 4. Repeat this process for each plasterboard sheet, ensuring a consistent gap size throughout the installation.
Leaving an expansion gap is crucial, as it allows the plasterboard to expand and contract without causing damage. While there are alternative methods, such as using flexible jointing compounds, leaving a gap is the most reliable way to ensure a long-lasting and professional result.
Now that you’ve created the expansion gap, it’s time to move on to the next step: applying jointing compound and tape.
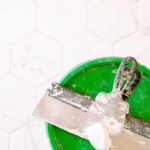
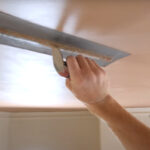
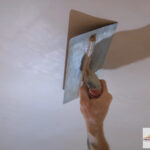
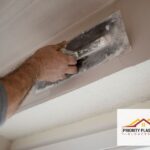
Apply Jointing Compound and Tape
Once you’ve prepared the joints, it’s time to apply jointing compound and tape. This step is crucial for achieving a smooth finish on your plasterboard walls.
To start, apply a thin layer of jointing compound over the joint using a trowel, ensuring it covers the entire length. Next, press the jointing tape firmly into the compound, making sure it lays flat and centered over the joint. Smooth out any wrinkles or bubbles using the trowel or a jointing knife.
For a smooth finish, apply a second layer of compound over the tape, feathering the edges to blend it seamlessly with the wall. Be sure to avoid common mistakes, such as using too much compound or not pressing the tape firmly enough.
With the jointing compound and tape in place, you’re now ready to move on to the next step: sanding and finishing the plasterboard.
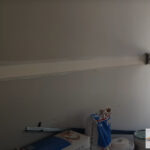
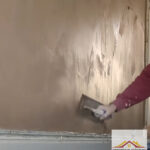
Sand and Finish the Plasterboard
After applying the jointing compound and tape, it’s time to sand and finish the plasterboard, giving it a smooth and polished appearance. Here are four sanding techniques and finishing tools you can use to achieve a flawless finish:
- Start with a coarse-grit sandpaper to remove any high spots or rough areas on the plasterboard. Use long, even strokes and apply light pressure to avoid damaging the surface.
- Switch to a medium-grit sandpaper to smooth out the surface further. Focus on blending the joints and ensuring a seamless transition between the plasterboard sheets.
- For a professional-grade finish, use a sanding block or a sanding pole. These tools provide stability and even pressure, resulting in a more uniform and consistent surface.
- Finally, finish off with a fine-grit sandpaper to achieve a smooth and refined texture. This step is crucial for creating a flawless base for painting or wallpapering.
By employing these sanding techniques and utilizing the right finishing tools, you can achieve an innovative and impeccable finish for your plasterboard walls.
Frequently Asked Questions
Can plasterboard be installed on uneven or damaged walls?
Yes, plasterboard can be installed on uneven or damaged walls. Before installing, you should repair any damaged areas using appropriate techniques like patching or filling. If the wall is significantly uneven, you can use alternative wall materials like furring strips or plywood to create a smooth surface. These materials can be attached to the existing wall to provide a stable base for the plasterboard installation.
This innovative approach ensures a successful and professional finish to your wall.
How long does it take for jointing compound to dry before sanding?
Before you can perfect the smooth finish of your walls, you must allow the jointing compound to dry properly. This drying time is crucial for achieving a flawless result.
Generally, the jointing compound takes around 24 hours to dry completely before sanding can begin. However, it’s essential to follow the manufacturer’s instructions for specific drying times.
Once the compound is dry, you can proceed with the sanding process, which will refine the surface and prepare it for the next steps in your innovative plasterboard installation.
Is it necessary to prime the plasterboard before painting?
Using a high-quality primer on plasterboard before painting is essential for achieving a professional and long-lasting finish. It helps to create a smooth and even surface, allowing the paint to adhere properly.
One common mistake to avoid is using a low-quality primer, as this can result in poor paint adhesion and uneven coverage. Another mistake is not properly preparing the plasterboard before priming, such as not sanding or cleaning the surface.
Taking the time to prime correctly will ensure a flawless and vibrant paint job.
Can plasterboard be installed directly on brick or concrete walls?
Yes, you can install plasterboard directly on brick or concrete walls, but it’s important to use timber studs.
Think of plasterboard as the superhero cape for your walls, providing a smooth and sturdy finish. Not only does it make installation easier, but it also offers advantages like sound insulation and fire resistance.
By using plasterboard, you’re embracing innovation and creating a modern and efficient space.
What is the recommended thickness of plasterboard for walls in residential buildings?
The recommended thickness of plasterboard for walls in residential buildings is typically 12.5mm. This thickness provides sufficient strength and durability while still being easy to work with.
However, there are alternative materials available such as 9.5mm or 15mm plasterboard, depending on specific project requirements. These alternative options may be suitable for different situations, such as where there are uneven surfaces or a need for greater soundproofing.
In the UK, the spelling is typically ‘plasterboard’ rather than ‘drywall’.