Are you tired of the worn-out exterior plaster on your home in the UK? Do you long for a fresh and vibrant look that will make your house stand out in the neighbourhood? Look no further! In this article, we will provide you with expert tips on repairing and maintaining exterior plaster to give your home the makeover it deserves.
Imagine a beautifully restored façade that exudes elegance and sophistication. Picture yourself strolling up to your house, greeted by a flawless exterior that leaves your guests in awe. With our innovative techniques and practical advice, you can achieve just that.
From identifying and assessing the damage to choosing the right repair materials, we will guide you through the entire process. Learn how to fill and patch cracks and holes, and discover the secrets to applying a protective finish that will keep your exterior plaster looking impeccable for years to come.
Don’t settle for mediocrity when it comes to your home’s appearance. Join us as we unveil the tips and tricks to transform your exterior plaster and create a lasting impression.
Identify and Assess the Damage
Now, take a close look at the damage on your exterior plaster and let’s figure out the best way to fix it up, so you can feel proud of your home once again.
Assessing the damage is the first step in determining the appropriate repairing techniques. Start by examining the extent of the cracks, chips, or flaking on the plaster. Look for any signs of moisture or mould as well. This assessment will help you determine the severity of the damage and the necessary repairs.
Once you’ve identified the issues, you can proceed to prepare the surface for repair. This involves cleaning the area thoroughly, removing any loose debris, and ensuring a smooth surface for the repair materials to adhere to.
Prepare the Surface for Repair
First things first, before you can start fixing those cracks and chips in your plaster, it’s crucial to properly prepare the surface.
Surface preparation techniques play a vital role in ensuring a successful repair. Begin by thoroughly cleaning the damaged area, removing any loose or peeling plaster. Use a wire brush or scraper to gently remove any dirt, debris, or loose material.
Next, dampen the surface with water to improve adhesion. This step is especially important if you’re working with a porous or absorbent substrate. Allow the surface to dry completely before proceeding with the repair. Proper drying time is essential to prevent moisture-related issues and ensure the longevity of the repair.
Once the surface is prepped and dry, you can move on to choosing the right repair materials.
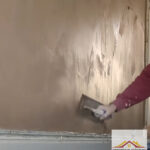
Choose the Right Repair Materials
In order to achieve a flawless repair job, it’s crucial to select the appropriate materials that’ll bring your damaged plaster back to life.
When it comes to exterior plaster repair in the UK, choosing the right materials is essential for durability and longevity. Start by selecting a high-quality plaster mix that’s specifically designed for exterior use. This’ll ensure that the repair is weather-resistant and able to withstand the elements.
Additionally, consider using a bonding agent to promote adhesion between the old and new plaster layers. As for tools, opt for a trowel that’s suitable for plastering and a hawk to hold the plaster mix. These tools’ll help you achieve a smooth and even application.
Now that you’ve chosen the right repair materials, let’s move on to the next step of filling and patching cracks and holes.
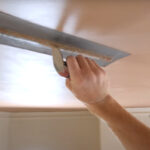
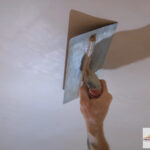
Fill and Patch Cracks and Holes
To achieve a flawless repair job, start by filling and patching any cracks and holes in your damaged plaster, creating a smooth and seamless surface. This is an essential step in the repairing process, as it ensures that the exterior plaster is restored to its original state.
There are various techniques you can use to fill and patch cracks and holes, depending on the size and severity of the damage. For smaller cracks, you can use a high-quality exterior filler that’s specifically designed for plaster repairs. Simply apply the filler using a putty knife, making sure to smooth it out evenly.
For larger holes, you may need to use a patching compound, which can be applied in layers until the hole is completely filled.
By addressing these common plaster issues, you’ll be well on your way to a successful repair.
Now, let’s move on to the next step: applying a protective finish.
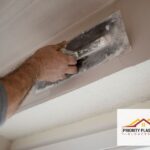
Apply a Protective Finish
Applying a protective finish to your repaired plaster is like adding a coat of armor, safeguarding it against future damage and preserving its newly restored appearance.
There are various protective finish options available that can enhance the durability and longevity of your exterior plaster. One popular option is a clear masonry sealer, which forms a protective barrier against moisture, UV rays, and pollutants. Another option is an elastomeric paint, which provides flexibility to accommodate the natural movement of the plaster without cracking.
Applying a protective finish not only ensures that your repaired plaster remains intact, but also adds a layer of aesthetic appeal. It can enhance the color, texture, and overall finish of the plaster, giving it a fresh and polished look.
By regularly inspecting and maintaining the exterior plaster, you can ensure its continued protection and longevity.
Transitioning into the next section, let’s discuss how to regularly inspect and maintain your exterior plaster.
Regularly Inspect and Maintain the Exterior Plaster
Ensuring the ongoing protection and longevity of your exterior plaster requires regular inspection and maintenance. By regularly inspecting your plaster, you can identify any potential issues early on and prevent them from escalating into more significant problems. Here are some inspecting techniques and maintenance tips to keep in mind:
- Check for any cracks or chips in the plaster and promptly repair them to prevent water damage.
- Look out for signs of mold or mildew growth, as these can deteriorate the plaster over time.
- Inspect the paint or protective finish regularly and touch up any areas that are peeling or fading.
- Keep an eye on the overall condition of the plaster, including any signs of discoloration or deterioration.
To ensure a thorough inspection, it’s recommended to establish a maintenance schedule and stick to it.
Regularly maintaining your exterior plaster won’t just enhance its appearance but also extend its lifespan, saving you time and money in the long run.
Frequently Asked Questions
Can I repair exterior plaster myself, or should I hire a professional?
Repairing exterior plaster can be a daunting task, but did you know that DIY repairs can save you up to 50% compared to hiring a professional?
However, it’s important to consider the cost and time factors involved. While DIY repairs may be more cost-effective, they can be time-consuming and require specialized knowledge.
Hiring a professional ensures a faster and more precise job, allowing you to focus on innovative ideas for your exterior.
How long will the repaired exterior plaster last before it needs to be redone?
To ensure the longevity of your repaired exterior plaster, it’s crucial to properly prepare the surface before starting the repair process. This involves removing any loose or damaged plaster, cleaning the area thoroughly, and ensuring it’s dry and free from debris.
Additionally, using high-quality materials and techniques specific to exterior plaster repair will enhance durability. By following these steps, you can expect your repaired exterior plaster to last for many years before needing to be redone.
Are there any special considerations or precautions I should take when repairing exterior plaster on an old or historic building?
When repairing exterior plaster on old or historic buildings, there are a few special considerations to keep in mind. Firstly, it’s important to use materials that are compatible with the original plaster, as using the wrong materials can cause damage.
Additionally, it’s crucial to assess the underlying structure for any potential issues, such as water damage or structural instability.
Finally, to protect the exterior plaster on historic buildings, it’s recommended to apply a suitable protective coating to prevent further deterioration.
Is it possible to match the color and texture of the existing exterior plaster when making repairs?
Matching the color and texture of existing exterior plaster when making repairs can be a challenge. Factors such as weathering, age, and the type of plaster used can affect the outcome. However, there are innovative techniques available that can help achieve a close match.
One method involves using tinted plaster or adding pigments to the mix. Another option is to apply a textured finish to mimic the original plaster. Consulting with a professional who specializes in historic building restoration can greatly assist in achieving the desired result.
Are there any specific weather conditions that are ideal for repairing exterior plaster, or can it be done at any time of year?
The ideal weather conditions for repairing exterior plaster are when it’s dry and mild. It’s best to tackle this task during the warmer months, as extreme heat or cold can affect the plaster’s ability to adhere properly. A dry climate ensures that the plaster will cure evenly and prevent any moisture-related issues.
Remember the adage, “Make hay while the sun shines,” and plan your exterior plaster repair during the best time of year to ensure optimal results.