Are you tired of staring up at your dull, cracked ceiling? Do you long for a fresh, smooth surface that will transform your living space? Look no further, because we have the ultimate solution for you.
In this step-by-step guide, we will walk you through the process of plastering your ceiling from start to finish. Get ready to unleash your inner DIY enthusiast and create a masterpiece that will leave your friends and family in awe.
But before we dive into the nitty-gritty details, let us build up the suspense. Imagine the satisfaction of achieving a flawlessly plastered ceiling, where every imperfection is expertly concealed. Picture yourself basking in the glory of your newly transformed room, infused with a sense of innovation and sophistication.
To embark on this exciting journey, you will need a few essential tools and materials. Don’t worry, we’ll provide you with a comprehensive list to ensure you have everything at hand.
So, roll up your sleeves and prepare to embark on an adventure that will revolutionise your home. Let’s get started on this transformative journey of plastering a ceiling.
Assess the Condition of Your Ceiling
Now that you’ve gathered your materials, it’s time to take a good look at your ceiling and see what needs to be fixed before you start plastering. This step is crucial because it helps you identify any repairs that need to be made, ensuring a smooth and flawless finish.
Start by examining the entire surface for cracks, holes, or uneven areas. Use a torch to inspect the ceiling closely, as some imperfections may be hard to spot. Once you’ve identified the repairs that need to be addressed, it’s time to choose the right plaster for the job. Consider factors such as the condition of your ceiling, the type of finish you desire, and the tools you’ll be using.
With this information in hand, you can now move on to gathering the necessary tools and materials for the next step.
Gather the Necessary Tools and Materials
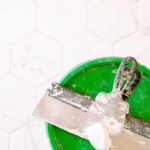
To successfully complete the task, it’s essential to gather all the tools and materials you’ll need. Some necessary tools include a trowel, plaster, and sandpaper. It’s crucial to choose the right plastering tools for achieving professional-looking results. A stainless steel trowel with a comfortable grip is recommended for spreading the plaster evenly and smoothly. You may also consider using a hawk to hold the plaster and a bucket trowel for mixing. Don’t forget to have sandpaper on hand for smoothing out any imperfections once the plaster has dried.
Tips for avoiding common plastering mistakes include ensuring the surface is clean and free of debris, mixing the plaster according to the manufacturer’s instructions, and applying it in thin layers to prevent cracking.
With all the tools and materials organized and ready, you can now move on to preparing the ceiling surface for plastering.
Prepare the Ceiling Surface
Make sure you thoroughly inspect the ceiling surface for any cracks, holes, or loose plaster, as these imperfections will need to be repaired before you can begin the plastering process.
Start by cleaning the ceiling using a broom or vacuum to remove any dust or debris. Use a damp sponge to wipe down the surface, paying close attention to any stains or grease marks. For stubborn stains, mix a solution of warm water and mild detergent and gently scrub the area.
Once the ceiling is clean, you can begin repairing any cracks or holes. For small cracks, use a flexible filler and a putty knife to fill in the gaps. For larger cracks or holes, use a patching compound and a trowel to create a smooth surface.
Transitioning into the next section, now that the ceiling surface is clean and repaired, you can mix and apply the plaster.
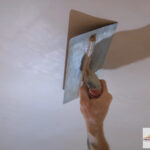
Mix and Apply the Plaster
Once the ceiling surface has been properly prepared, it’s time to mix and apply the plaster. Before starting, make sure you have all the necessary tools and materials, including a mixing bucket, plaster, water, and a trowel.
Begin by following the instructions on the plaster packaging to mix the plaster with water in the bucket. Use a paddle attachment on a drill to achieve a smooth and lump-free consistency.
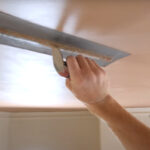
Once the plaster is mixed, start applying it to the ceiling using a trowel. Spread the plaster evenly and work in small sections to ensure a consistent finish. Use techniques such as feathering and cross-hatching to achieve a smooth and level surface.
Avoid common mistakes, such as applying too much plaster or leaving ridges. With careful application, you can achieve a professional-looking plastered ceiling.
Transitioning into the next section, we will now discuss how to smooth and level the plaster.
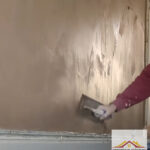
Smooth and Level the Plaster
Now, let me show you how to effortlessly achieve a flawlessly smooth and level plastered ceiling, so you can impress your friends and neighbors with your impeccable DIY skills.
Here are four key techniques for achieving a smooth finish:
- Feathering: Use a trowel to smooth out any ridges or imperfections by gently gliding it over the plaster, gradually reducing pressure and feathering the edges.
- Wet Trowelling: Dampen your trowel with water and lightly go over the surface, creating a smooth and polished finish.
- Sponge Work: Dip a clean sponge in water and gently dab it on the plaster, blending any uneven areas and creating a uniform texture.
- Sanding: If you encounter any stubborn bumps or rough patches, use fine-grit sandpaper to smooth them out.
Troubleshooting common issues:
- If the plaster starts to dry too quickly, mist it with water to keep it workable.
- If you notice cracks forming, stop and apply additional plaster to fill them in before continuing.
Now that your plaster is smooth and level, it’s time to move on to the next section: finishing and painting the ceiling.
Finish and Paint the Ceiling
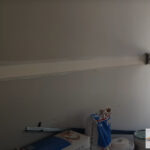
To achieve a professional-looking finish, all you need to do is give your ceiling a flawless coat of paint after the plaster has been smoothed and leveled. Start by choosing the right paint color that complements your space and sets the mood you desire. Opt for a high-quality paint that offers good coverage and durability.
Before painting, make sure the plaster is fully dry and free from any dust or debris. Use a primer to create a smooth surface for the paint to adhere to. When applying the paint, use a roller or brush in even strokes, working from one end of the ceiling to the other.
To avoid visible brush or roller marks, maintain a wet edge and blend each new stroke with the previous one. Allow the paint to dry completely before applying a second coat if necessary.
Following these tips will help you achieve a smooth and flawless finish for your plastered ceiling.
Frequently Asked Questions
How much does it cost to hire a professional plasterer for ceiling plastering?
Hiring a professional plasterer for ceiling plastering is like unlocking a hidden masterpiece. The cost comparison may make your wallet wince, but the results are worth every penny. DIY may seem tempting, but without the expert touch, you risk a sub-par finish. A skilled plasterer brings innovation and precision to the table, ensuring a flawless, durable ceiling. Embrace the artistry and invest in the expertise for a truly transformative plastering experience.
Can I use regular paint to finish the plastered ceiling?
Yes, you can use regular paint to finish a plastered ceiling. However, there are alternative finishing options that can provide a more innovative and unique look. Consider using textured paint or metallic finishes to add depth and interest to your ceiling. Another option is to apply a faux finish, such as a marble or wood grain effect, for a truly innovative and eye-catching result. These alternatives can elevate the overall aesthetic of your plastered ceiling and make it stand out.
What are the potential risks or challenges involved in plastering a ceiling?
When plastering a ceiling, there are several potential risks and challenges you may face. One of the main risks is the possibility of the plaster cracking or crumbling over time if it’s not applied correctly.
Additionally, achieving a smooth and even finish can be challenging, requiring precise technique and attention to detail.
Another challenge is the physical labor involved in the process, as plastering a ceiling can be strenuous and time-consuming.
However, with proper knowledge and innovative techniques, these risks and challenges can be overcome for a flawless plastered ceiling.
Is it necessary to remove furniture and cover the floor before plastering the ceiling?
Before embarking on the art of plastering, make sure you’re prepared to give your furniture and floor some TLC. Covering furniture and protecting the floor are essential steps to avoid any unwanted mess or damage.
Shield your precious belongings from the splatters and spills that come with plastering. By taking this precaution, you’ll not only maintain the integrity of your furniture and floor, but also save yourself the hassle of cleaning up afterwards.
How long does it typically take for the plastered ceiling to fully dry before painting?
To speed up the drying process of a plastered ceiling before painting, there are a few tricks you can try. Firstly, ensure proper ventilation by opening windows or using fans.
Secondly, avoid sealing the room too tightly, as it can trap moisture.
Additionally, using a dehumidifier can help remove excess moisture from the air.
Common mistakes to avoid include applying too thick a layer of plaster, which can prolong drying time, and not allowing enough time for the plaster to cure before painting.